
Author: admin

  • Video Lead Form Best Practices: Choose Fields With Purpose

    Video Lead Form Best Practices: Choose Fields With Purpose

    Your video offers a worksheet, but the form asks for a phone number, company details and a project description. Before sending viewers to it, ask what each answer will actually change. A question that serves no immediate purpose does not become useful just because the form can display it.

    These video lead form best practices focus on that decision: what to ask, what to leave optional and what to save for a later conversation. They assume you have already decided that a contact request belongs in the viewing experience. Gate timing and lead-export operations are separate tasks.

    Video lead form best practices: decide what belongs

    Write the viewer’s request in one sentence, then assess each proposed question against it. “Send me the worksheet” calls for different information from “Call me about this service.” Do not start by copying every column from your team’s contact database into the form.

    The GOV.UK Design System’s question-page guidance recommends knowing why each question is asked and requesting only information that is needed. That principle is useful here without adopting an entire government-service form pattern for a video player.

    Give every proposed field one of four decisions:

    • Needed now: without the answer, the team cannot fulfill the specific request.
    • Optional context: the answer has a defined use, but its absence does not prevent fulfillment.
    • Ask later: the answer belongs to a different decision or a later conversation.
    • Remove: nobody can explain how the answer will be used.

    This is an editorial planning exercise, not a claim that a player automatically sorts questions or moves them between stages.

    Give email, name and phone different jobs

    Email: when the offer is to send a resource by email, an address has a direct purpose. Keep the surrounding request specific about the resource. Do not describe a request for one document as if it were a request for every future message your team might send.

    Name: decide whether a name is necessary to carry out the request or merely helpful for addressing a response. If the resource can be provided without it, there needs to be a separate reason to make it a condition of receiving the resource.

    Phone: connect the number to a promised call or another explicit task. If the offer does not mention a call and nobody is responsible for making one, a phone question deserves reconsideration. Contact details should not introduce a different offer halfway through the form.

    For an additional question, write down the decision its answer would affect. “Which part of the demonstration would you like to discuss?” can help someone prepare a requested conversation. A broad “Tell us everything about your business” asks for much more work without defining the needed answer.

    Compare three offers before choosing the questions

    The following are hypothetical design exercises, not customer results or ready-made Vidzy form templates. They illustrate how the offer changes the information needed.

    A worksheet demonstrated in the video

    The immediate task is to provide the worksheet by email. Begin with the address needed for that delivery. A phone number or project budget does not help send the file. If the team wants to discuss a project later, make that a separate invitation rather than a hidden condition of getting the worksheet.

    A requested callback about a service

    A phone number now has a clear role because the viewer is requesting a call. A name may help the person making that call. Review any extra contact fields against the actual process: if email is also required, explain its purpose rather than treating it as automatically necessary. Choose a form implementation that supports the requirements you have verified.

    A discussion following a technical demonstration

    An email address and one focused context question may give the team enough information to arrange a useful discussion. Ask about the part the viewer wants to explore, rather than demanding a complete specification. Leave detailed discovery for the conversation if those answers are not needed to arrange it.

    Separate gate choice from field choice

    Deciding whether viewers must submit an email to continue is different from deciding which additional information belongs in the request. Do not assume that an optional gate makes every field optional, or that a required gate makes every available field necessary.

    Vidzy supports timed email lead capture, name, phone and a custom field. Its lead gates can require email to continue or allow viewers to skip an optional request. These capabilities provide options for the lead request; they do not establish every field’s requirement rules, validation behavior or suitability for a particular form design.
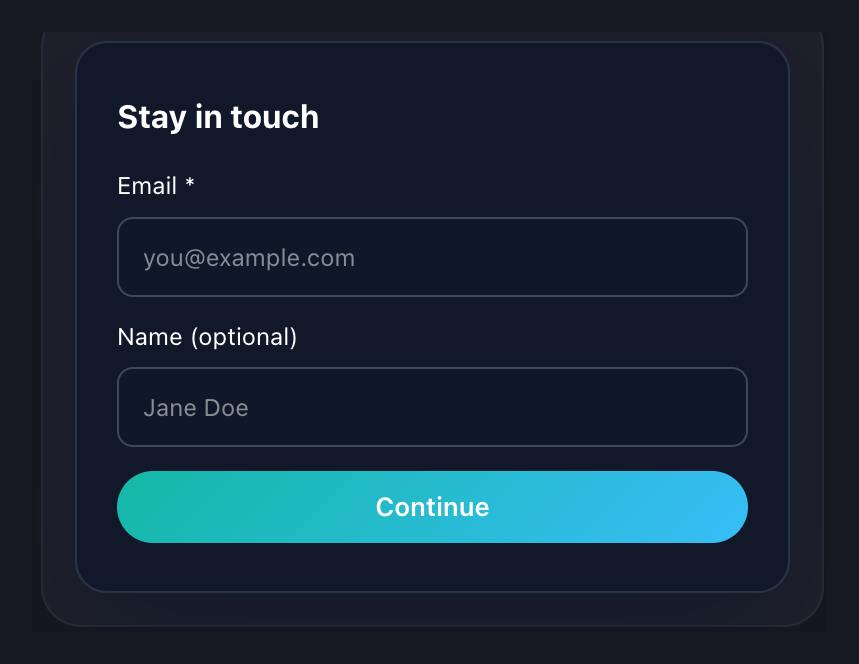
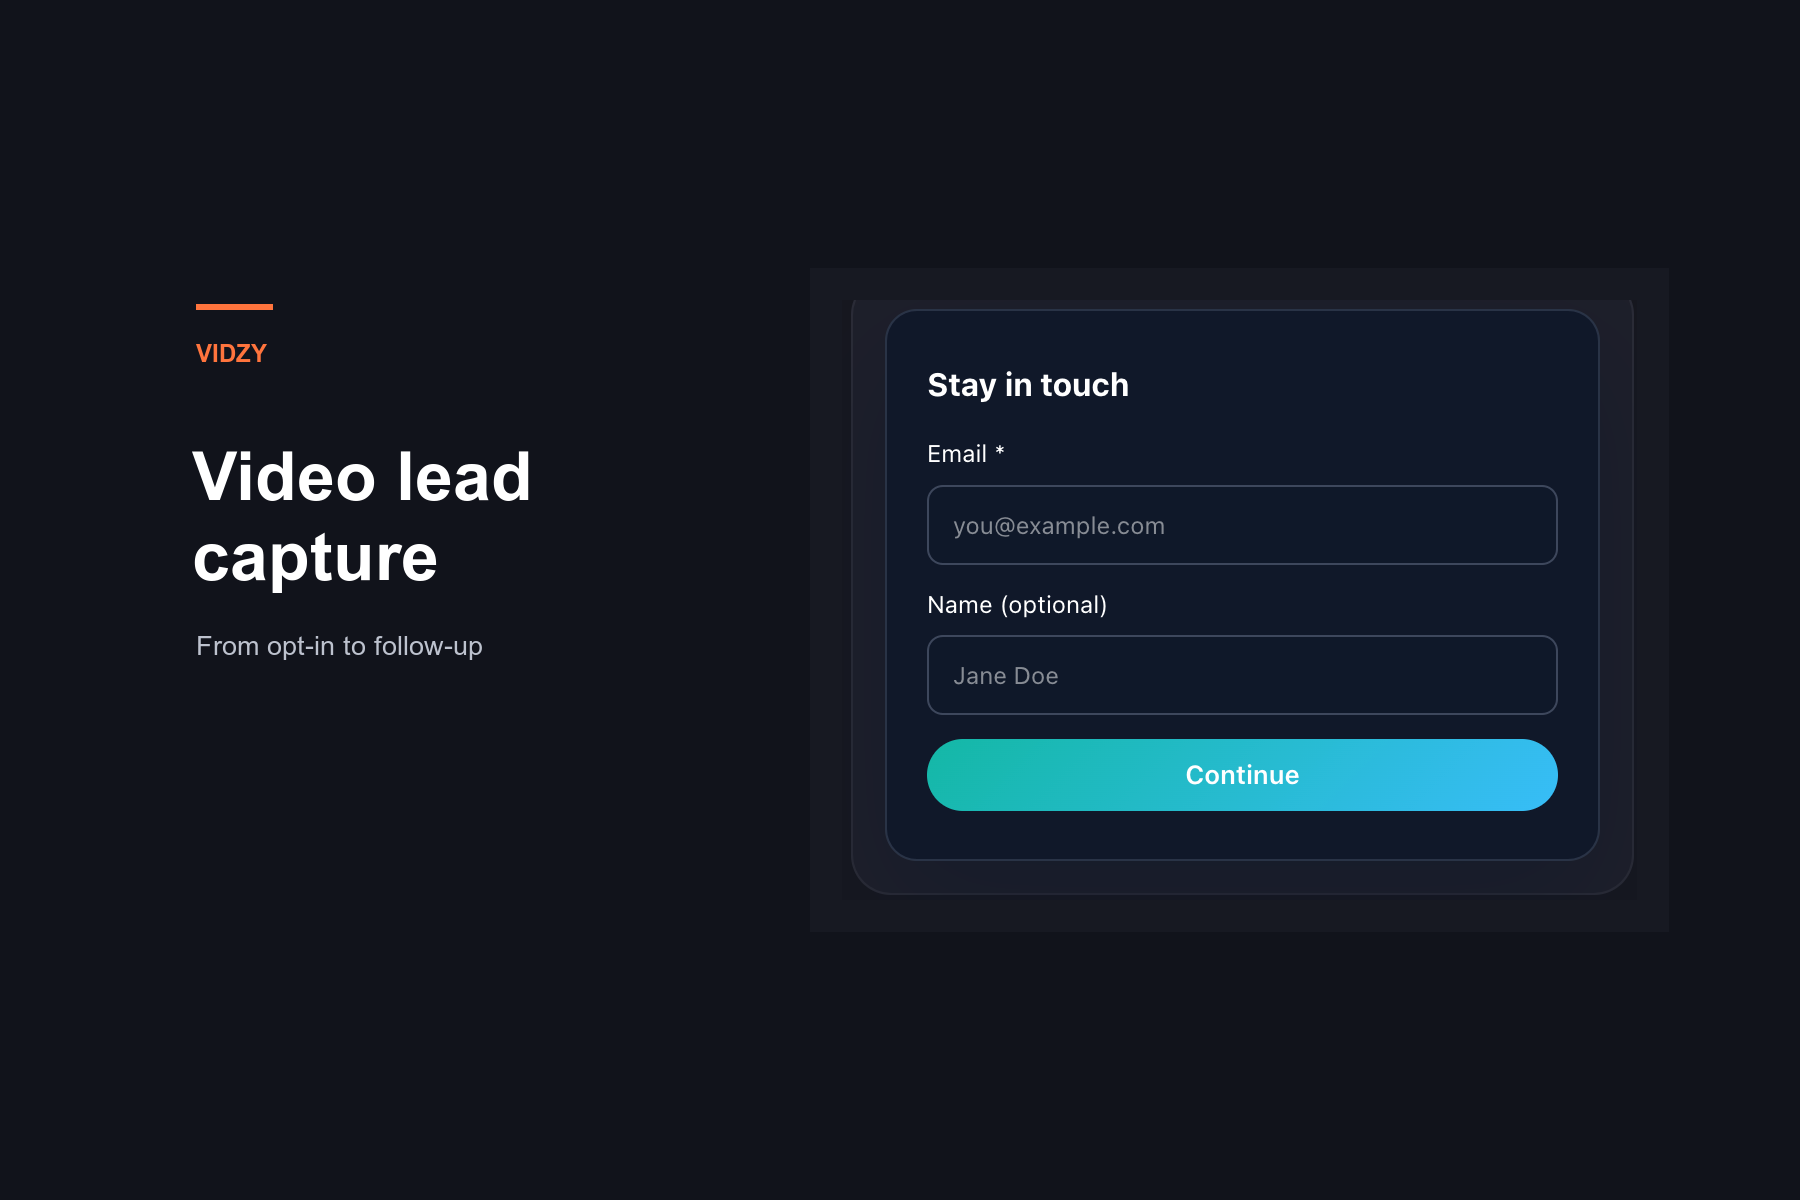
    Vidzy lead-form preview showing an email field and an optional name field
    One actual Vidzy form preview, cropped to exclude account details and unrelated controls. The optional-name label is visible; example values and demo wording are unchanged. This is not a recommended campaign message or a demonstration of every field configuration.

    Use the preview to notice the distinction between the information being requested and the wording around it. Then check your actual viewer-facing form against the field decisions you wrote down. Do not infer behavior from a preview alone.

    Make each question understandable without guessing

    The W3C tutorial on labeling controls explains how labels identify form controls. Use that guidance when evaluating the form implementation rather than relying on example text inside an input; a screenshot alone cannot establish programmatic labeling or accessibility compliance.

    Review the wording at the point where the viewer has to answer. Would someone know what information belongs in the field, why it is requested and whether they may leave it empty? Where an expected format needs explanation, make that instruction available rather than relying on a failed submission to teach it.

    Read the request without the video’s narration. A person who paused playback or missed a sentence should still be able to understand the form. If an answer needs a lengthy explanation, reconsider whether that question belongs in this short interaction.

    Use a field-review worksheet before configuration

    Complete one row for each proposed question in your own planning document. These worksheet columns are not claimed Vidzy fields or software features.

    Questions to resolve before adding a lead-form field
    Worksheet itemWhat to write
    Requested informationThe exact question the viewer would see.
    Immediate useThe specific task or decision that needs the answer.
    Missing-answer consequenceWhat genuinely cannot happen if the answer is absent.
    DecisionNeeded now, optional context, ask later or remove.
    Viewer explanationA short, honest reason for asking, where clarification is needed.

    Have the person responsible for responding review the worksheet. If they cannot name a use for an answer, revisit the question before adding it. If an answer is needed, confirm that the form implementation can collect it in the intended way without assuming unverified behavior.

    Finish by checking the actual form on the page, including its labels, optional-field behavior and what happens after submission. The useful outcome is a request the viewer can understand and your team can act on, not the largest possible contact record.

  • Video CTA Examples: What to Say for Six Viewer Goals

    Video CTA Examples: What to Say for Six Viewer Goals

    “Learn more” could mean opening a guide, watching a demonstration or speaking to a salesperson. If the next step is already clear to you, name it for the viewer. A useful video CTA gives them enough information to decide whether to continue.

    The video CTA examples below pair a spoken request with a short clickable label. Choose the example that matches the viewer’s task, then adapt it to your actual offer. These are original illustrative scripts, not customer campaigns, tested winners or promises of better results.

    1. Help the viewer apply a method

    Use this approach when the video teaches a process and a resource would help the viewer put it into practice.

    • Spoken line: “Use the planning worksheet to map these steps to your next campaign.”
    • Clickable label: “Open the planning worksheet”

    The resource has a specific job: taking the method out of the video and into the viewer’s work. The sentence does not need to claim that the worksheet will transform their results.

    Choose the verb carefully. “Open” fits a resource available to read or use. If the next page asks for an email before sending it, say so in the surrounding request and use a label such as “Request the worksheet.” Do not promise an immediate download when another action comes first.

    2. Let the viewer inspect a specific demonstration

    Use this when an overview leaves a practical question unanswered and a separate demonstration genuinely answers it.

    • Spoken line: “Watch the reporting walkthrough to see how the finished report is assembled.”
    • Clickable label: “Watch the reporting walkthrough”

    Naming the subject gives the viewer a reason to watch another video. “Watch more” only describes the amount of content, not what the next video contributes.

    Keep a recorded demonstration distinct from a sales appointment. If the destination asks someone to arrange a live session, “Request a reporting demo” is more accurate. Do not borrow the lower-commitment wording of a recording for a meeting request.

    3. Give an evaluating viewer a comparison task

    Use this after explaining meaningful differences between options, when the viewer needs to examine those differences in more detail.

    • Spoken line: “Compare the support options to see which responsibilities stay with your team.”
    • Clickable label: “Compare support options”

    This wording names both the subject and the decision. It is more informative than “Find your perfect fit,” which promises a conclusion without explaining what the viewer will actually examine.

    The destination should contain the named comparison. If it is only a general enquiry form, change the request accordingly. Avoid using “compare” as a softer-sounding substitute for an undisclosed sales conversation.

    4. Invite a conversation about a particular problem

    Use this when the next useful step requires information about the viewer’s situation, rather than another generic resource.

    • Spoken line: “Tell us about your rollout so we can discuss the implementation questions you need answered.”
    • Clickable label: “Request an implementation call”

    The subject makes the invitation concrete. The verb “request” also leaves room for the actual process: submitting an enquiry is not necessarily the same as reserving an appointment.

    If the destination truly lets someone choose and confirm a slot, “Book an implementation call” may fit. Describe charges, eligibility or other important conditions where relevant, using only facts you can substantiate. Do not add “free” or a response-time promise merely because it sounds reassuring.

    5. Connect an event invitation to its subject

    Use this when a video introduces a real upcoming session and registration is available.

    • Spoken line: “Join the campaign-planning workshop to work through the briefing exercise with us.”
    • Clickable label: “Register for the planning workshop”

    Name the event or subject instead of relying on “Save my seat.” The viewer should recognize the same session when they reach the registration page.

    If the video will remain available after registration closes, plan replacement wording. “Watch the workshop recording” describes a different offer and should be used only when that recording is actually available. Avoid a deadline or scarcity claim unless it reflects the real event.

    6. Help a shopper choose the relevant product option

    Use this when the video demonstrates an item but the shopper still needs to inspect sizes, materials or variants.

    • Spoken line: “View the desk’s dimensions and finishes to choose the version that fits your room.”
    • Clickable label: “View dimensions and finishes”

    The request supports a concrete shopping question without pretending the viewer is already ready to pay. “Buy now” is a different instruction; use it only when that is the action you intend to offer.

    Replace the example’s attributes with the information your product page actually provides. Do not promise available stock, delivery dates or a fit guarantee unless the current offer supports those statements.

    Edit the action before adding persuasion

    A practical first draft has a verb and a specific object: open the worksheet, watch the demonstration, compare the options, request the call. Add a reason when the connection to the video is not obvious.

    Then look for language that changes the commitment:

    • Watch versus book: consuming a recording is different from arranging a meeting.
    • Open versus request: immediate access is different from submitting information and waiting.
    • Compare versus buy: evaluating options is different from entering a purchase process.

    Do not make an action sound easier by obscuring what it requires. Make it easier to understand. Once the verb is accurate, remove decorative promises such as “unlock your potential” if they add no useful information.

    Let spoken copy explain and link text identify

    The narration has room to explain why a resource matters. A clickable label can be shorter while preserving its purpose. Shortening “Open the campaign-planning worksheet” to “Open it” saves words but loses the thing the viewer is choosing.

    W3C’s guidance on link purpose says that purpose should be identifiable from the link text or its programmatically determined context. Descriptive text is a useful starting point; narration alone should not be assumed to supply that programmatic context. Clear copy does not, by itself, establish that a whole player is accessible.

    Read the label without the script. Then read it beside the destination’s heading. If either reading suggests a different task, revise the wording before recording the final line.

    Use the copy with a real clickable next step

    Vidzy provides an embeddable video player with clickable CTA links and timed CTAs at chosen timestamps. Those capabilities provide a way to connect the request with a clickable action; the resource, event, booking process or shop described in these examples must be prepared separately.

    These examples do not imply that Vidzy supplies those destination services. They are writing patterns to adapt to the offer you actually have.

    Choose one example and replace its subject with your specific resource or task. Give the spoken line and label to a reviewer, and ask what they expect to receive or do next. If their answer differs from your offer, rewrite the request rather than adding another persuasive adjective.

  • Video Analytics: Build a Measurement Plan Before You Report

    Video Analytics: Build a Measurement Plan Before You Report

    Your campaign is ready, but nobody has checked whether the embedded video records the actions the report will need. Discovering that gap after launch leaves you with a difficult question: did viewers do nothing, or did the measurement setup miss what they did?

    A video analytics measurement plan addresses that uncertainty before reporting begins. It records what should be collected, where the evidence will appear, how you will test it, and who owns the result. The task here is collection readiness, not interpreting a retention chart or choosing a universal performance benchmark.

    What belongs in a video analytics measurement plan?

    The plan is a working agreement between the marketer, the person responsible for the website or player, and the person preparing reports. It should be specific enough that someone other than its author can check the setup.

    For every required measure, record the video and placement, the action you expect to observe, the collecting system, the documented counting rule, the verification method and the owner. If one of those is unknown, record the gap in your planning document instead of treating a dashboard label as an answer.

    Keep the first version small. A launch report that needs evidence of playback and a particular next step does not automatically need every available interaction. Add a measure when you can name the reporting question it serves.

    Build a tracking inventory by placement and version

    Start with the actual pages where the video will appear. A title alone may be an ambiguous identifier if the same asset is embedded on several pages or replaced with a new edit.

    Fields for a practical video-measurement inventory
    Field What to record
    Placement The page and location of the intended embed, using your team’s internal naming convention.
    Video version A stable reference to the specific edit being measured.
    Required observation The viewer action or viewing measure needed for the report.
    Collection source The system expected to record it and the report or diagnostic view used to verify it.
    Counting rule The documented trigger, unit and treatment of repeated actions, or an explicit unresolved question.
    Acceptance check The controlled action, expected evidence and person responsible for checking it.

    As a hypothetical planning example, a product demonstration appears on a comparison page and a campaign landing page. Keep separate inventory rows if the team needs to report those placements separately. Then establish whether the selected collection system can distinguish them. Naming two rows in a spreadsheet does not create that capability in the software.

    Verify collection coverage before assuming it

    Installing a website analytics tool does not, by itself, establish that your particular player and every in-video action are measured. Check the documented conditions for the collection method you intend to use.

    For example, Google Analytics’ enhanced-measurement documentation scopes its video-engagement events to YouTube embeds with JavaScript API support enabled. That is a specific condition, not a promise of automatic coverage for every embedded player. This example does not establish a Vidzy integration with Google Analytics.

    Ask the implementation owner to identify which collection mechanism is active on each placement. Record any prerequisites and known exclusions in the inventory. Where a required observation has no verified source, either resolve collection before launch or narrow the promised report.

    Run a controlled collection check

    Use an authorized test environment or an agreed test window. Coordinate with the report owner so test activity is documented and handled appropriately; do not assume it can be automatically filtered out.

    1. Record the test context. Note the page, video version, device or browser, time and applicable consent state. Follow the site’s normal consent process rather than bypassing it to make data appear.
    2. Perform one defined action. Use the inventory’s acceptance check. Avoid combining several actions when you need to identify which one produced the evidence.
    3. Inspect the designated source. Confirm that the expected record or measure appears using the system’s supported diagnostic method and documented processing expectations.
    4. Compare the identity and meaning. Check that the evidence belongs to the intended placement and video where those distinctions are supported. A changed total somewhere else is not enough.
    5. Record the outcome. Mark the check passed, failed or inconclusive, with the evidence location and the next owner. Repeat for the other required observations.

    If nothing appears, keep “no activity recorded” separate from “the visitor took no action.” Check the collection prerequisites, reporting delay and test context before drawing a behavioral conclusion. A single successful test is also limited evidence: it validates the tested path, not every possible browser or viewing situation.

    Investigate duplicate collection without inventing a correction

    If one controlled action appears to produce more records than expected, first confirm the documented counting rule. Several records may represent different events rather than duplicates.

    Ask the implementation owner to inspect the collection paths and determine whether the same observation is being sent more than once. Record the finding and repeat the controlled check after any authorized correction. Do not simply divide the reported count to make it match an expectation.

    Two systems may also describe a similar action differently. Keep their names and definitions attached to the values; do not add totals together unless you have established that doing so is meaningful and does not count the same activity twice.

    Agree on the reporting handoff

    Choose the authoritative source for each reported measure before building the summary. The handoff should include the inventory, collection-check results, reporting period, known gaps and any video or page changes that affect comparability.

    Assign one person to resolve collection issues and one to maintain the report. Set a review point based on the campaign’s actual decisions rather than a fixed reporting habit. When an embed or video version changes, identify which acceptance checks need to be repeated.

    Where Vidzy contributes

    Vidzy provides an embeddable player with video analytics, watch-time tracking, CTA click tracking and opt-in tracking. These approved capabilities can inform which observations you investigate for an embedded-video report.

    They do not establish specific counting rules, event payloads, integrations or automatic joins to another system. Verify the definitions and collection behavior your plan requires; this guide does not prescribe Vidzy instrumentation or promise end-to-end attribution.

    Use this launch-readiness handoff

    • Each report question has a named measure and collection source.
    • The intended placements and video versions are recorded.
    • Required collection conditions have been checked.
    • Controlled checks have evidence, outcomes and owners.
    • Unresolved gaps and test activity are disclosed to the report owner.
    • A change to the video or embed triggers the appropriate recheck.

    Complete the inventory for one important video before extending it across the site. Hand it to the person who will prepare the report and ask them to trace each required measure back to verified collection evidence.

  • Video Heatmap: How to Read the Legend and Compare Reports

    Video Heatmap: How to Read the Legend and Compare Reports

    A video heatmap can look self-explanatory: some sections have more color than others. But a colored section does not explain itself. Before using the report in a presentation, you need to know what each mark represents, whose playback it includes and how the legend works.

    This guide helps you decode that report. The goal is to describe it accurately and recognize which other reports can be compared with it, before drawing conclusions about the video.

    What does a video heatmap represent?

    In playback analytics, a video heatmap represents activity along a video’s timeline. Read its documented definition to establish the exact activity being represented. Do not assume that the term means a map of where someone’s eyes looked or where their pointer moved across the image.

    Start with two questions: what does one row or mark stand for, and what changes its appearance? The answer should come from the report’s help text or documentation, not from the colors alone.

    Identify the reporting unit first

    A single-session record and an audience-wide summary answer different questions. The first can describe a particular playback journey; the second combines activity. Treating one session as the audience’s typical experience would require evidence beyond that one record.

    For a concrete, platform-specific example, Wistia describes a heatmap as a representation of a single viewing or listening session. Its glossary describes the engagement graph, in contrast, as an aggregate view. Those are Wistia’s report definitions, not definitions of Vidzy’s heatmaps.

    When opening an unfamiliar report, identify whether it describes a playback session, a viewer or a combined population. Do not assume that a session equals a unique person, or that an anonymous record identifies a contact. If the unit is unclear, leave it unresolved in your notes instead of choosing the interpretation that fits your story.

    Read the legend before naming a pattern

    Colors need an explicit key. Avoid labeling a warm-colored section “good engagement” or a pale section “lost interest” unless those words accurately describe the documented measure. A legend describes an encoding, not a judgment about content quality.

    Wistia’s official heatmap guide provides a useful example: white denotes unplayed portions, green denotes one play and yellow denotes two plays, with warmer colors for further repeats. It also explains that the percentage at the end counts repeatedly played portions only once. A colored timeline and its summary can therefore describe different aspects of the same session. Do not apply this legend to another product without checking its documentation.

    Save the legend with any report excerpt you share. Without it, a colleague may mistake repeat playback for a larger audience or interpret a change of color as a conversion signal.

    Separate coverage from repeated playback

    Consider a hypothetical video split into ten equal sections. A session plays four different sections, then plays one of those sections again. Under a measure that counts distinct sections reached, coverage is four out of ten. Under a measure that counts all complete section plays, the total is five.

    Neither number contradicts the other. They count different things. This is an illustrative accounting example, not a Vidzy calculation, a benchmark or a real customer result.

    Before explaining a summary next to a heatmap, establish whether it counts distinct portions, accumulated playback time or something else. Also check how partial plays are handled. A summary label such as “engagement” is not enough to reconstruct its formula.

    Check compatibility before comparing reports

    Two reports placed side by side can appear comparable simply because both use a timeline. Use the following checks before describing one as higher, lower or improved.

    Checks for comparing two video reports without mixing definitions
    Check What must be clear
    Reporting unit Whether both reports describe sessions, viewers or aggregates; a single session is not interchangeable with an audience summary.
    Measure and scale Whether the marks encode counts, time or percentages, and whether color thresholds stay fixed between reports.
    Timeline Whether positions refer to elapsed time or relative progress, and whether the video versions contain the same material at that position.
    Grouping Whether a mark represents a moment or a wider interval; an interval does not identify an exact second.
    Included activity Whether the reports cover the same relevant audience and period, and how repeats enter the calculation.

    For example, if a revised introduction moves a demonstration later, the same timestamp no longer points to the same content. Align the relevant sections before comparing them. Similarly, if each chart chooses its own color thresholds, the darkest tile in one report need not represent the same quantity as the darkest tile in another.

    If these details are unavailable, describe each report separately. A qualified description is more useful than a precise-looking comparison built on incompatible measures.

    Attach a short reading card to the report

    Before sharing a heatmap, add a plain-language note containing:

    • Report: the platform and report name.
    • Unit: what one record represents.
    • Legend: what color, height or another visual mark encodes.
    • Timeline: the video version and how positions are grouped.
    • Summary: what any adjacent total or percentage counts.
    • Comparison limit: which differences prevent a direct comparison.

    Use explicit wording such as “This report represents one playback session; its colors show the documented repeat categories.” Use that sentence only when both statements are verified. Otherwise, note the missing definition and request it from the report owner.

    Using heatmaps with Vidzy

    Vidzy is an embeddable video player with video analytics and heatmaps. Those capabilities do not establish a particular legend, aggregation method or formula. This article does not assign the Wistia example or the hypothetical section-counting method to Vidzy.

    Start with one report you need to explain and complete its reading card. Resolve the missing definitions before comparing it with another report or forwarding a cropped chart to your team.

  • Password-Protected Video: When It Fits and What to Check

    Password-Protected Video: When It Fits and What to Check

    You have a video for a selected audience, not a public launch. Adding a password sounds like a straightforward next step. First, though, decide what you need that password to accomplish: discourage casual viewing, restrict access to named people, or satisfy a more demanding requirement.

    Those are different jobs. This guide explains how to evaluate password-protected video, define a sensible sharing boundary, and check the viewing experience without assuming that a password prompt proves more than it does.

    What does password-protected video mean?

    In a shared-password viewing model, a viewer supplies the video’s password to pass an access check. That is different from requiring each viewer to sign in with an individually authorized account.

    For a concrete platform example, Vimeo’s password-protection documentation explains that viewers enter a password to watch and do not need a Vimeo account. This describes Vimeo’s documented behavior, not a universal implementation or an instruction for another player.

    A shared secret can also be shared onward. Knowing it is not, by itself, evidence that the person watching is the person you originally invited. If identifying each viewer matters, write that as a separate requirement rather than assuming the password provides it.

    Write the access brief before choosing the control

    Start with five decisions:

    • Audience: Is access intended for a small review group, a changing team, or individually approved people?
    • Content sensitivity: What would happen if someone outside that audience watched?
    • Forwarding: Is sharing the link and password acceptable, discouraged, or incompatible with the purpose?
    • Duration: When should access end, and who is responsible for ending it?
    • Evidence: Do you need to know that viewing was possible, or establish which authorized person accessed the material?

    For a hypothetical example, a team might share a low-sensitivity draft demonstration for informal feedback. Its owner may accept that an invited reviewer could forward the details. That is a different requirement from distributing material that only individually approved recipients may access. The example is a decision exercise, not a customer result or a recommendation for sensitive content.

    Decide whether a shared password fits

    Questions that separate a simple sharing barrier from a broader access requirement
    Your requirement What to establish before proceeding
    An extra step before casual viewing Does the actual viewing path require the expected password, and is onward sharing an acceptable risk?
    Only named people may watch How does the system identify each person and decide whether that person has permission?
    One recipient must lose access Can access be withdrawn for that individual without relying on everyone using the same shared secret?
    Copies must be controlled What separate controls and limitations apply to downloading, recording or redistribution?
    Sensitive or regulated material Has the responsible security or compliance owner assessed the complete setup against the actual requirements?

    Do not turn an unanswered row into an assumed capability. Password protection alone does not establish named-person authorization, copy prevention, DRM or compliance. These questions apply to the setup you are evaluating; they are not claims that a particular product includes or lacks additional controls.

    Check the whole viewing path, not just the prompt

    The distinction between identity and permission matters beyond video. OWASP’s authorization guidance separates verifying an identity from deciding which actions are allowed, and recommends validating permissions on every request. For a video owner, the practical question is whether the intended restriction applies throughout the delivery path, not merely whether one page displays a password field.

    Use a non-sensitive test video in an environment you own or are authorized to assess. Record the configuration and date, then check:

    1. A visitor without the password: Open the intended viewing page outside the owner’s signed-in session. Record what can be seen before access is granted.
    2. An incorrect password: Make one ordinary incorrect entry and confirm that the expected content remains unavailable. This is a functional check, not a brute-force test.
    3. The intended viewer: Enter the correct password and check playback on the page and device types your audience will use.
    4. Other intended delivery paths: Ask the technical owner to verify relevant embeds, source-host pages and media access against the same requirements. Do not assume a restriction on one page automatically covers another path.
    5. The owner session: Compare it with the visitor test so that being signed in does not conceal a problem recipients will encounter.

    Passing these checks confirms only the behavior you observed. It is not a penetration test or proof of security. For higher-risk material, ask a qualified reviewer to assess the architecture and requirements before distribution.

    Plan how sharing ends

    A sharing plan needs an owner after the invitation goes out. Decide who handles access questions, where recipients should report trouble, and what event ends the review period.

    If you expect to change a password or withdraw access, first establish what your chosen system supports. Then test that exact action with a non-sensitive video, including what an already-open viewing session can still do. Do not promise immediate revocation, individual removal or session behavior without verification.

    Keep the recipient instructions short: where to watch, how to obtain access through your agreed channel, whether forwarding is allowed, and whom to contact. Never use an account login password as the video’s shared viewing password.

    Where Vidzy fits

    Vidzy’s embeddable video player supports password-protected video. That capability is a starting point for evaluating a viewing setup, not a substitute for the access brief above.

    This guide does not establish Vidzy plan availability, password-setting instructions, identity controls, source-path enforcement or revocation behavior. Verify the implementation details relevant to your requirements before relying on them.

    Before sharing your next video, complete this sentence: “These people should be able to watch this material until this point, and this is what we will do if access details are forwarded.” If the answer requires more than a shared password can establish, resolve those requirements before sending the invitation.

  • How to Embed Video on a Website: A Practical Setup Guide

    How to Embed Video on a Website: A Practical Setup Guide

    You have a video ready and a page where it belongs. The next step looks simple: copy something from the video service and paste it into your website. But a video URL, an embed snippet and an uploaded file are different inputs. Putting the right one in the wrong editor field can leave you with a link, visible code or an empty space.

    To embed video on a website, first identify what your editor accepts. Use a supported-provider video URL in a URL-based embed block, or put the provider’s supplied HTML into an appropriate HTML area. Then save the page and test the result outside the editor. The installation is not finished just because a preview looks correct.

    Choose the correct input before you start

    Look at the field you are filling in, not just the name of the video service. These are three different routes:

    • Video URL: A link to the video on its provider’s site. Use it when the website editor explicitly supports embedding from that provider through a URL field.
    • Embed HTML: A snippet supplied for placing the player on another page. Use the editor’s supported HTML or code-embedding area, following the provider’s instructions.
    • Video file: The media itself. An upload control is asking for a file, not a watch-page link. Uploading is a separate workflow from the hosted-video embedding covered here.

    Do not manually turn a watch-page URL into supposed embed code. Retrieve the actual code from the provider, or use your editor’s documented URL-based route. This keeps installation decisions separate from guesses about how the player works.

    Prepare the source and the destination page

    Before editing, confirm which video version should appear and who should be able to watch it. Keep the source page available so you can compare it with the embedded result. Also identify the exact page section that will receive the player.

    Work in a draft or staging page where possible. Save a copy of the existing section before replacing anything. If the site uses a page builder, establish which editor actually owns that section; pasting into a different editing surface can make later maintenance confusing.

    Write down the input type you are using. “Provider video URL in an Embed block” is a clearer handoff note than “video added.” It tells the next editor where to investigate if the source changes.

    Embed a supported video URL in WordPress

    WordPress’s block editor supports URL-based embedding from services including YouTube and Vimeo. Its official embedding documentation distinguishes this from uploading the media to WordPress.

    1. Open the intended post or page in the block editor.
    2. Add an Embed block, or the supported provider’s dedicated embed block.
    3. Paste the video URL into the block’s URL field and complete its embed action.
    4. Save the draft and inspect the page preview.

    This route depends on provider support. A block accepting YouTube URLs does not establish that it accepts every video service’s URL. If you have been supplied HTML instead, use the HTML route below rather than pasting the snippet into a URL field.

    Use supplied embed HTML when that is the intended route

    Get the snippet from the player or hosting provider you intend to display. For example, YouTube’s desktop procedure is to open the video, choose Share, choose Embed and copy the supplied HTML. That sequence is documented in YouTube’s embedding guidance; it is not a universal menu sequence for other players.

    In WordPress, add a Custom HTML block and enter the supplied markup using its editing interface. Preview the result, save, then reopen the saved page. Other website editors may provide a different HTML insertion area; use their documented method.

    Permissions matter. The WordPress Custom HTML documentation explains that users without the required capability can have disallowed markup, including script and iframe tags, removed when saving. If code disappears, ask the site administrator to check the supported installation route. Do not disable site protections simply to make a snippet persist.

    Copy the complete supplied snippet without adding settings from an unrelated tutorial. If it needs adjustment, make one documented change at a time and retain the original for comparison.

    Where Vidzy fits into the embedding workflow

    Vidzy’s embeddable video player works through HTML embedding and is compatible with WordPress. Users keep their video hosted on their existing provider.

    Those capabilities do not mean a generic URL block will automatically recognize a Vidzy link. For a Vidzy installation, establish the actual embed instructions for your setup rather than adapting another provider’s snippet. This guide does not assume a particular Vidzy code format, plugin or sequence of dashboard buttons.

    The same acceptance checks still apply: the intended player must appear on the saved page, the correct video must play, and the page must work for its intended audience.

    Check the saved page, not only the editor

    Run these checks before handing the page over for release. Treat them as acceptance criteria, not as claims that every player supplies the same controls.

    • Correct source: Start playback and confirm the video is the intended version, not merely a familiar thumbnail.
    • Audience access: Test under conditions representative of the intended viewer. For a public page, use a signed-out test environment when available; an administrator’s session is not a substitute.
    • Basic interaction: Try starting and pausing playback, then test the controls offered by the chosen player.
    • Narrow-screen layout: Check that the player stays inside its content column, with no clipping or horizontal scrolling. Inspect both the player and its surrounding section.
    • Usability: Check that visible controls remain readable and operable. Review keyboard interaction and any available caption controls as part of the wider page review.
    • Persistence: Reload the saved page and confirm the embed remains present.

    A draft preview may require an editor login. If that prevents a representative access test, record the test as pending rather than claiming it passed. Use an approved staging arrangement or ask the person responsible for release to complete it.

    Troubleshoot the symptom you actually see

    The page shows a link or code instead of a player

    Recheck the input and editor field first. A URL-based block and an HTML area serve different purposes. Compare what you pasted with the provider’s instructions before replacing the video or changing the whole page.

    The embed disappears after saving

    Compare the saved content with the original snippet. For WordPress, revisit the permission-dependent filtering described above. Bring the source instructions and the changed snippet to the administrator; that is more useful than repeatedly pasting the same code.

    The player appears, but the video will not play

    Record the exact error and check the provider’s source and embedding settings. YouTube, for example, allows owners to disable embedding, and its guidance describes restrictions for age-restricted videos. A source that opens for you is not sufficient evidence that it can play in the intended embedded context.

    The player extends beyond the page

    Inspect the content container and the provider’s sizing instructions. Ask the site maintainer to check how the embed fits the available width while preserving its proportions. Hiding the overflow can conceal controls; verify the complete player remains usable after any layout correction.

    Leave a useful installation record

    Record the destination page, source video, embedding method, person responsible for the source and checks still outstanding. If a later editor changes the source or surrounding layout, repeat the affected checks.

    Start with one saved page. Confirm the input route, verify playback and fit, and document anything you could not test. That gives the person reviewing the page a concrete result to approve.

  • Branded Video Player: Match Your Page Without Hiding Playback

    Branded Video Player: Match Your Page Without Hiding Playback

    A video player can use your brand color and still feel wrong on the page. Its play button may disappear against the opening frame, compete with a nearby action, or look like decoration rather than something a visitor can use.

    The goal of a branded video player is not to customize every available setting. It is to make the viewing experience belong on the page while keeping playback recognizable. Start with a small visual brief, compare a few treatments in context, and check the result before calling the design finished.

    What is a branded video player?

    A branded video player is a player whose visual treatment has been adapted to fit a brand or website. That might mean choosing an overall skin or changing the play button’s appearance. The exact controls available depend on the product; “customizable” does not mean every element can be changed.

    Separate the player from the footage inside it. A branded title sequence is part of the video. A play button or surrounding player treatment is part of how people encounter that video. You can assess the two together without treating them as the same design task.

    Also keep appearance separate from hosting, access control and provider-branding removal. A player that fits your palette does not automatically establish any of those capabilities. If they matter to the project, evaluate them as separate requirements.

    Write a visual brief for the actual page

    Before choosing a skin, look at the page where the video will appear. Note its background, the nearby text and buttons, and the role of the video. A treatment that looks restrained in a gallery can become difficult to distinguish on a similarly colored page.

    Record three decisions:

    • What should feel consistent? Identify the page’s visual character, such as a quiet neutral surface with one accent. Do not assume every brand color belongs in the player.
    • What should stand out? The start of playback needs to be recognizable. Decide how it can be noticeable without visually overpowering the video’s subject.
    • What can remain standard? Familiar-looking playback elements may serve the reader better than a highly decorative treatment. Customize only where there is a clear reason.

    Keep a screenshot of the intended page beside the candidate player treatment during review. This gives the team a shared reference and avoids approving the player in isolation, then discovering that it clashes with the finished page.

    Preserve the invitation to press play

    The play control has a job before it has a brand style. A visitor should be able to identify it against the surrounding surface and understand that it starts the video. A pale icon on a pale button, or a dark button over a dark frame, deserves closer inspection even when both colors belong to the brand palette.

    Review the symbol and its background separately. A button can stand out from the video while the symbol inside it remains hard to see. Likewise, a legible symbol does not help much if the entire control is difficult to locate.

    W3C’s media-player accessibility guidance includes keyboard support, visible focus, clear labels and sufficient contrast between text, controls and backgrounds. These are evaluation requirements, not a claim that a particular skin or color choice makes an entire player accessible.

    Compare Vidzy player skins without assuming extra controls

    Vidzy provides an embeddable, customizable player experience with player skins and play-button style and color customization. Those options are relevant when you want the player treatment to fit the surrounding page.

    The useful comparison is not how many styles are available. It is which treatment supports your page’s visual brief while keeping the start of playback recognizable. Compare the relationship between the play symbol, its background and the rest of the player.

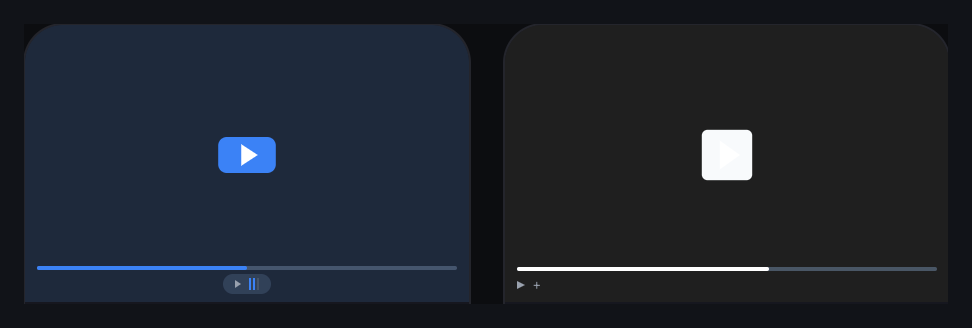
    Two Vidzy player-skin previews with blue and monochrome play-button treatments
    Two previews cropped from Vidzy’s skin gallery. Account details and unrelated controls are excluded; the original visual treatments are preserved.

    These previews are starting points for review, not an accessibility endorsement. In the monochrome example, the light play symbol against a light button deserves particular attention before use. Judge the actual rendered result rather than assuming a gallery preview has passed every usability check.

    Player skins and play-button customization do not imply that you can independently change every control, add any visual asset or reproduce an arbitrary design. Keep the requested treatment within the options you have verified for your own setup.

    Test the treatment against different visual conditions

    Use the actual opening frame and page background when comparing candidates. If the player appears over changing footage during an interaction, review the relevant moments too. A design approved against an empty dark preview may behave visually quite differently beside detailed imagery.

    These hypothetical examples show how a visual brief can guide the decision:

    • A bright product demonstration on a white page: check whether a light player treatment leaves the play control difficult to identify. A stronger accent may be worth testing, but assess the symbol’s contrast as well as the surrounding button.
    • A restrained professional-services page: a vivid treatment might compete with the explanation. Try a quieter skin while preserving a clear playback invitation.
    • A colorful educational page: matching every accent may add noise. Choose one visual relationship to carry through, such as the main accent, and leave the rest uncomplicated.

    None of these choices guarantees more plays or better business results. They are design hypotheses to inspect in context, not universal prescriptions for a particular audience or industry.

    Review the real embed at smaller sizes

    Place the candidate on its intended page before sign-off. Reduce the viewport and check the full player boundary, not just the central play button. The player should fit the content area without requiring horizontal scrolling or clipping important controls.

    Check whether the play symbol remains easy to identify, nearby page elements collide with the player, or the caption and supporting explanation become separated from it. If the layout breaks, investigate the page and embed configuration rather than trying to disguise the problem with a different color.

    Then review keyboard interaction, visible focus and enlarged-page viewing in the chosen implementation. Styling and functionality need separate checks. A static screenshot can show a visual treatment; it cannot prove that the live player is usable with different input methods.

    Make the approved treatment easy to review again

    Keep a short design record with the chosen skin, the intended play-button treatment, a reference page capture and any unresolved checks. Record what the team approved rather than relying on a description such as “the blue one.” This can be an ordinary project document; it does not require a player-specific approval feature.

    Revisit that reference when the page background, brand palette or video’s opening changes. The same treatment may need another review in a different context. Do not assume that a previously acceptable combination remains equally clear everywhere.

    For your next embedded video, choose one candidate treatment and review it beside the finished page at a wide and a narrow width. Keep the changes that help the player belong, and remove the ones that make playback harder to recognize.

  • Video CTAs: Build a Clear Path from Playback to Action

    Video CTAs: Build a Clear Path from Playback to Action

    A video can make a clear request and still leave the viewer with nowhere useful to go. The narration says “see the checklist,” the clickable label says “learn more,” and the link opens a general homepage. Each piece works on its own, but the path does not deliver what the video promised.

    Good video CTAs connect the request, the clickable action and the destination. This guide shows how to specify that connection, implement it without losing the original promise, and test it before sending viewers through it.

    What makes a video CTA actionable?

    A video call to action asks the viewer to do something next. It might be spoken, displayed as text in the footage, or presented as a clickable element. Those are different mechanisms: a sentence in the narration or a graphic baked into the video does not, by itself, create a working link.

    For a website video, decide where the interaction will live. It could be a clickable player element or a separate page link that the video clearly identifies. The important question is whether a viewer can find and complete the requested step in the actual viewing context.

    Write the path as a short statement: “After watching this explanation, the viewer can open the comparison worksheet using the clearly identified link.” If the link does not exist, the worksheet is unavailable, or the page requires an unexpected action first, the path is unfinished.

    Specify the whole path before configuring the player

    Create a small implementation specification that a writer, video editor and website owner can all use. It should describe the experience they are building, not just the text that appears on a control.

    Information to agree before implementing a video CTA
    ItemWhat to recordAcceptance question
    RequestThe next task the video asks the viewer to completeCan someone describe the task without guessing?
    Visible labelThe wording on the clickable actionDoes it identify the same task as the video?
    DestinationThe exact final URL, checked outside an administrator sessionDoes it deliver the promised resource or next step?
    CompletionWhat counts as finishing that next stepIs opening the page enough, or is another action required?
    OwnerThe person responsible for the destination and its follow-upWho checks the path when the campaign changes?

    This also exposes dependencies. A registration CTA is not ready just because the video editor has finished. Someone still needs to confirm that registration is open, the page describes the right event, and the confirmation explains what happens next.

    Make the destination fulfill the label

    Use wording that helps people predict where the action leads. W3C’s guidance on link purpose explains that a link’s purpose should be identifiable from its text or associated context. A descriptive label is a practical starting point; it is not, on its own, proof that the whole player or page is accessible.

    Consider these hypothetical planning examples, not customer results:

    • “View the checklist”: send the viewer to the checklist or clearly explain any access step before they click. An unrelated resource library makes them search again.
    • “Book a consultation”: show the consultation process and any necessary booking steps. If the destination only collects an inquiry, use wording that reflects that instead.
    • “Explore this product”: open the relevant product information, not a broad catalogue that leaves the viewer to identify the item.

    Read the label and the destination’s opening text together. They do not need identical wording, but they should describe the same offer. If the destination needs substantial explanation before the promise becomes recognizable, reconsider the destination or narrow the request.

    Connect the request to a clickable CTA in Vidzy

    Vidzy provides an embeddable video player with clickable CTA links and timed CTAs at chosen timestamps. Those capabilities let you connect a video request with a clickable next step. They do not remove the need to prepare and test the destination itself.

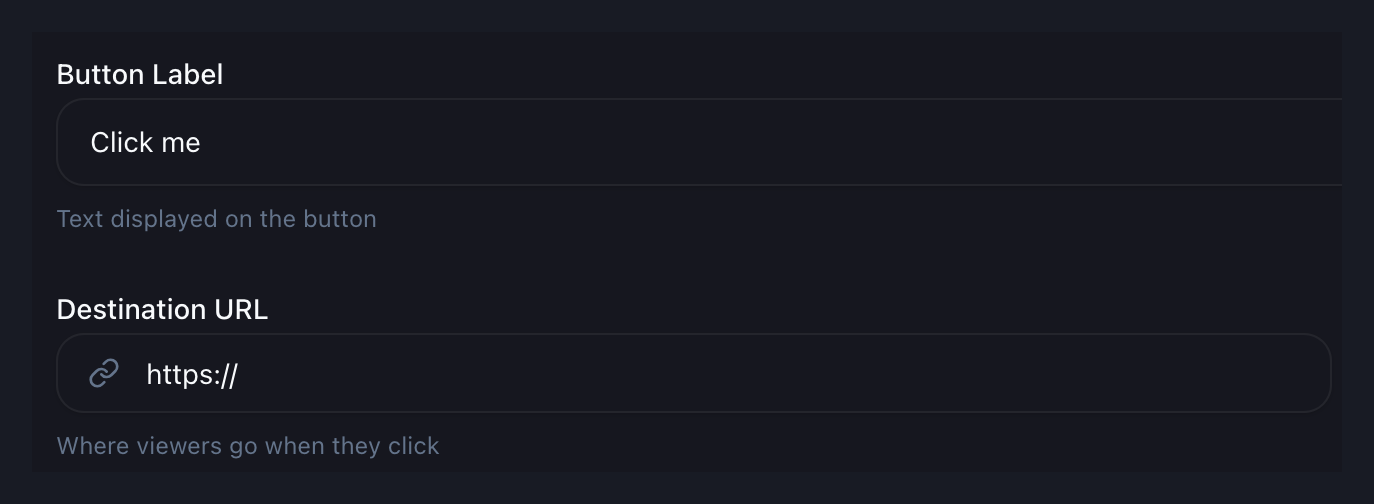
    Keep the viewer-facing label and destination URL distinct in your specification. The label explains the action; the URL determines where the link leads. Use the same distinction when reviewing the configuration.

    Vidzy CTA configuration excerpt showing the label and destination URL fields
    A focused excerpt from Vidzy’s CTA configuration. Original sample values are shown; unrelated controls and account areas are excluded.

    The configuration example uses sample text, “Click me,” and an incomplete URL. These are not recommended campaign copy or a working destination. Replace sample values with the wording and final address from your specification before testing.

    Timing is a separate decision. Choose a moment consistent with the video’s request, then test that configured moment in playback. This implementation check is different from deciding which point in the story should carry the offer.

    Test the experience the viewer will actually encounter

    A configuration screen cannot confirm the full experience. Test the video on its intended page, then follow the action through to the destination. Use a visitor session rather than relying only on an account that already has administrative access.

    1. Check the request against the recording. Confirm that narration and on-screen wording still describe the current offer. A later URL change can leave the video promising something else.
    2. Play through the interaction. Confirm that the action appears as intended and remains understandable beside the video content. Do not assume a saved setting proves the viewing experience.
    3. Activate the actual link. Check the final destination, including any redirects. Confirm that visitors can access the promised next step without an unexplained sign-in or missing page.
    4. Check a smaller screen and keyboard interaction. Inspect legibility, reachability and the ability to identify and use the action. Record problems rather than assuming the player or page meets every accessibility requirement.
    5. Complete the next step safely. Where appropriate, use a clearly identified test submission and coordinate with the person receiving it. Confirm the destination’s response, not merely that the first page loaded.

    These are checks to perform on your chosen setup, not guarantees about browser behavior or features supplied by a particular player. If a check fails, fix or reconsider the path before treating the CTA as ready.

    Verify click records without confusing them with completion

    Vidzy includes CTA click tracking. Before relying on the records in a report, establish the applicable measurement definition and check the expected behavior with a controlled test. Do not assume that a click count represents unique people, a completed registration or a sale.

    Keep the immediate interaction and the destination’s completion evidence separate. If the request is to read a resource, arriving at it may be the relevant next step. If it is to submit an inquiry, the click and the submission answer different questions. Obtain completion evidence from the system responsible for that action; do not assume an automatic connection between systems.

    For the implementation handoff, record the test date, video version, destination and what was observed. This creates a reference for investigating a later failure without turning one test into a performance benchmark.

    Give the CTA an owner after launch

    Recheck the path when an offer closes, a resource moves, a page is redesigned or the video is replaced. Decide who receives those changes and who confirms that the request still makes sense. A working URL can still point to an outdated promise.

    Before preparing your next video CTA, complete the specification for one action and ask someone else to follow it from playback to destination. Have them describe what they expected and what happened. Resolve any mismatch before interpreting campaign results.

  • YouTube Embed vs a Marketing Video Player for Landing Pages

    YouTube Embed vs a Marketing Video Player for Landing Pages

    The choice between a YouTube embed and a marketing video player is not really about which player is universally better. It is about what the video must do on a particular page.

    A standard YouTube embed may be enough when you want a straightforward way to place a YouTube video on a site. A marketing-focused player becomes more relevant when the page needs a controlled visual treatment, an in-player next step, lead capture, or viewer-behavior evidence tied to the embedded experience.

    You may not need to choose between YouTube hosting and a marketing player at all. Some players can use a YouTube video while changing the experience presented on your page. That makes hosting and presentation two separate decisions.

    Which option should you choose?

    Choose a standard YouTube embed if YouTube’s documented embed controls meet your requirements and its player presentation suits the page. Evaluate a marketing-focused player if the video must perform a defined job beyond playback, such as presenting a timed call to action, collecting an email address, or giving your team specific on-page viewing signals.

    Use requirements rather than assumptions:

    Decision criteria for a standard YouTube embed and a marketing-focused player
    Criterion Standard YouTube embed Marketing-focused player to evaluate
    Primary job Place a YouTube video or playlist on a website or blog. Shape the embedded video around a specific on-page marketing journey.
    Hosting The embedded content remains on YouTube. Depends on the product. Vidzy can use an existing YouTube video without moving its hosting.
    Playback controls YouTube documents parameters for controls, autoplay, captions, looping, start time, and JavaScript API access. Confirm that the product supports the exact playback and design controls your page needs.
    Brand presentation YouTube controls its branding treatment; the former modestbranding parameter is deprecated and has no effect. Evaluate player styling, visible platform elements, and the degree of brand control. Vidzy supports a branded, customizable player.
    Next action Define separately what should happen around or after playback; this article does not treat YouTube’s embed documentation as a complete inventory of action features. Verify the exact in-player action required. Vidzy supports timed, clickable calls to action and links to arbitrary destinations.
    Lead capture Assess the full page workflow rather than assuming the embed itself supplies your required form. Vidzy supports timed email opt-ins and lead gates. Confirm that this is appropriate for the viewer journey.
    Viewer evidence Decide which questions you need the data to answer and verify the relevant reporting documentation. Vidzy supports watch-time tracking, drop-off analysis, heatmaps, CTA click tracking, opt-in tracking, and replay tracking.

    The right-hand column is not a promise about every marketing player. It identifies capabilities to verify. Confirm the product’s metric definitions, available controls and applicable plan before committing to a workflow.

    Start with the landing page’s job

    Before comparing software, write one sentence that defines the video’s role. For example:

    • Explain the product clearly enough for a visitor to request a demo.
    • Show a tutorial, then direct an interested viewer to the relevant guide.
    • Introduce a gated resource and collect an email address at an appropriate point.
    • Let visitors watch a public YouTube video without adding another marketing workflow.

    These jobs do not require the same player. If playback is the entire requirement, adding conversion features can create work without solving a problem. If the video has a defined next step, treating the player as a passive rectangle may leave the page team dependent on surrounding copy and buttons.

    Also distinguish the page goal from the distribution goal. YouTube has its own recommendation surfaces, as described in its official recommendation guidance. Publishing for discovery on YouTube and designing an embedded landing-page experience are related, but they are not the same task.

    When a standard YouTube embed is a sensible choice

    YouTube provides an established, documented path for embedding a video or playlist: copy the embed HTML and add it to a website or blog. Its iframe player also supports parameters for needs such as displaying controls, autoplay, captions, looping, a start point, and JavaScript API access. The precise behavior and implementation requirements are maintained in the official YouTube embedded-player documentation.

    A standard embed may be a better fit when:

    • The video is already on YouTube and straightforward playback is the main requirement.
    • The available YouTube player parameters cover the controls you need.
    • You are comfortable using YouTube’s player treatment on the page.
    • Your next action already works well elsewhere on the landing page.
    • Your team does not have a defined use for additional in-player interaction or viewing evidence.

    YouTube also documents a Privacy Enhanced Mode for website embeds. It uses the youtube-nocookie.com domain and prevents views in that mode from influencing a viewer’s YouTube browsing experience or personalized advertising in the ways described by YouTube. Read the exact scope and implementation notes in YouTube’s embedding guidance. It should not be summarized more broadly as a guarantee that no data handling or compliance work is required.

    Where embed parameters stop being a branding strategy

    Player parameters can alter supported playback behavior, but they should not be mistaken for unlimited presentation control.

    Two details are particularly useful when reviewing older YouTube embed advice:

    • The modestbranding parameter is deprecated and has no effect. YouTube says its player determines the appropriate branding treatment based on several signals.
    • Setting rel=0 does not disable related videos. YouTube documents that related videos will instead come from the same channel.

    Those facts do not make a YouTube embed unsuitable. They clarify the boundary of what its current parameters can promise. If a landing page requires a more controlled player presentation, record that as a selection requirement and evaluate products designed around it.

    When a marketing-focused player deserves evaluation

    A marketing-focused player is worth considering when the player itself must participate in the visitor journey. The key is to name the required behavior instead of shopping from a broad feature list.

    You need an action at a particular moment

    If the video builds toward a specific next step, an in-player CTA may connect that action to the relevant moment. Vidzy supports timed, clickable calls to action and can link a CTA to an arbitrary destination.

    This capability does not guarantee more clicks or conversions. The offer, wording, timing, audience, and destination still matter. Choose it because the workflow requires a contextual action, not because a button alone proves effectiveness.

    You need lead capture within the viewing flow

    For videos that justify an email request, Vidzy supports timed email opt-ins and lead gates. Before using either, decide what value the viewer receives, why the request appears at that point, and what happens after submission.

    A form outside the player may still be better when it needs more explanation, when the video should remain freely accessible, or when your existing page workflow already performs the task cleanly.

    You need evidence tied to viewer behavior

    Vidzy provides video analytics, including watch-time tracking, drop-off analysis, heatmaps, CTA click tracking, opt-in tracking, and replay tracking. These signals can help teams identify what happened around the video and decide what to investigate next.

    They do not prove why a viewer behaved a certain way or that the video caused a business outcome. Before comparing tools, define the question, confirm each metric’s applicable definition, and determine whether your wider workflow can connect player events to the intended outcome.

    Separate video hosting from player choice

    “YouTube or a marketing player” can be a false choice. Hosting answers where the video file and platform content live. The embedded player answers what the visitor encounters on your page.

    Vidzy supports YouTube videos while allowing the video to remain hosted with the existing provider. That means a team can keep its YouTube workflow and evaluate a different embedded experience for selected landing pages.

    This approach may be relevant when:

    • You still want the video available on YouTube.
    • You do not want a player evaluation to become a hosting migration.
    • Only certain high-intent pages need a more controlled or interactive experience.

    Confirm the exact operational workflow before adopting any tool. A feature can fit the landing-page goal while still creating unacceptable review, accessibility, analytics, or maintenance work for the team.

    Use this checklist before switching players

    1. State the video’s job. Define the audience, page, message, and intended next step.
    2. List must-have player behavior. Separate playback controls from branding, CTAs, lead capture, and analytics.
    3. Verify current documentation. Do not rely on an old tutorial for embed parameters or on a comparison page for a competitor’s current features.
    4. Decide whether hosting must change. Ask whether the new player can use the source you already maintain.
    5. Review the whole journey. Check the message before the video, the action in or around it, and the destination after a click or submission.
    6. Define useful evidence. Specify what you will learn from each event or viewing signal before collecting more data.
    7. Test implementation quality. Review the real embed across relevant devices and check accessibility, consent, playback, and destination behavior.

    If the standard YouTube embed satisfies that checklist, keeping it may be the more proportionate choice. If the checklist identifies a need for controlled presentation, timed actions, lead capture, or the listed viewer-behavior signals, a conversion-focused video player such as Vidzy is more relevant to evaluate.

    Write the requirements first, then compare the live products against them. That produces a defensible decision even if the answer is to keep the player you already use.

  • Video Lead Capture with Vidzy: From Opt-In to Follow-Up

    Video Lead Capture with Vidzy: From Opt-In to Follow-Up

    A viewer submits an email while watching your video. Who checks that it was captured, what does the viewer receive next, and who handles that next step? A lead-capture plan should answer all three questions before the campaign starts.

    Vidzy supports timed email opt-ins, required or optional lead gates, opt-in tracking and CSV export. Its Leads dashboard lets you review, search and filter captured leads. Those capabilities give you a way to collect and review contact information around the viewing experience. Your team still needs to connect that action with the offer you made.

    This guide focuses on that practical workflow: define the handoff, test the capture path, review the exported information and deliver the promised next step. It assumes you have already decided that email capture fits the video.

    What Vidzy contributes to video lead capture

    As an embeddable, conversion-focused video player, Vidzy brings lead capture into the video experience. These capabilities matter here:

    • Timed email opt-ins: an email-capture mechanism tied to the viewing timeline.
    • Lead gates: require email to continue or let viewers skip an optional request.
    • Lead-form fields: support for name, phone and a custom field alongside email capture.
    • The Leads dashboard: view captured leads, search for a contact and narrow the list with filters.
    • Opt-in tracking: a way to track opt-in activity.
    • CSV export: export filtered leads or all records.

    Keep the product capability and the team’s process distinct. Exporting an email address does not, by itself, fulfill a resource request or answer a prospect’s question. Plan those downstream tasks separately instead of assuming that capture completes the job.

    Write the capture-to-follow-up plan first

    Start with a short campaign note outside the player. Record the video, its audience, the offer, the next action and the person responsible for that action. Be specific enough that another teammate could take over without reconstructing the campaign.

    For a hypothetical workshop on planning a product launch, the note might read:

    • Video: a workshop showing how to organize a launch checklist.
    • Offer: receive the editable checklist used in the workshop.
    • Next action: the campaign owner sends the requested checklist through the team’s separately managed delivery process.
    • Completion check: verify that the resource is accessible and matches the workshop example.

    This is an illustrative campaign plan, not a customer story or a description of automatic delivery in Vidzy. Its purpose is to make the work after capture explicit.

    Avoid a vague task such as “follow up with leads.” It leaves the recipient, message and owner undefined. “Send the requested checklist” is a task someone can complete and check.

    Configure the lead request around that plan

    Vidzy’s lead forms support name, phone and a custom field. Decide what information the immediate handoff needs before using those options. For the workshop checklist example, establish whether anything beyond an email is needed to fulfill the request; don’t collect extra details simply because a field is available.

    Vidzy lead-form preview showing an email field and an optional name field
    A crop of the form preview in Vidzy’s lead-capture configuration screen. This example shows email and an optional name field; the sample copy is not a recommended campaign message.

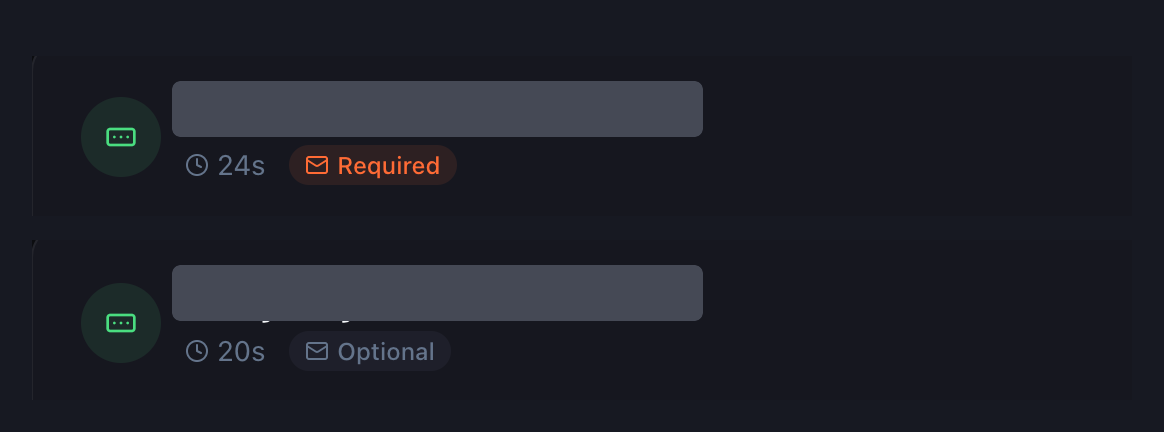
    Check the gate mode as well as the requested information. Vidzy supports required email gates and optional requests that viewers can skip. Choose the intended mode deliberately, then confirm it in the viewer-facing test.

    Required and Optional status labels in two Vidzy lead-gate list excerpts
    Two excerpts from the lead-gate list, with gate names redacted. The timestamps are settings in these examples, not recommended timings or performance benchmarks.

    Test one complete capture path

    Before sending campaign traffic, use an address controlled by your team to test the configured experience. Treat the following as checks to perform, not promises that every setup behaves identically:

    1. Open the actual page. Review the video and surrounding offer together, rather than checking only the configuration screen.
    2. Reach the email request. Confirm that the observed experience matches what you intended to show.
    3. Make a test submission. Note what happens next and whether the viewer receives a clear indication of the result.
    4. Check capture and export. Find the test email in Leads, then verify it in a CSV export. Inspect the actual file rather than assuming which columns it includes.
    5. Complete the handoff. Have the responsible teammate carry out the promised next step using the team’s chosen process.

    If something fails, record the page, video and test conditions so the issue can be investigated. A successful-looking form screen is not a substitute for checking the captured address and the promised follow-up.

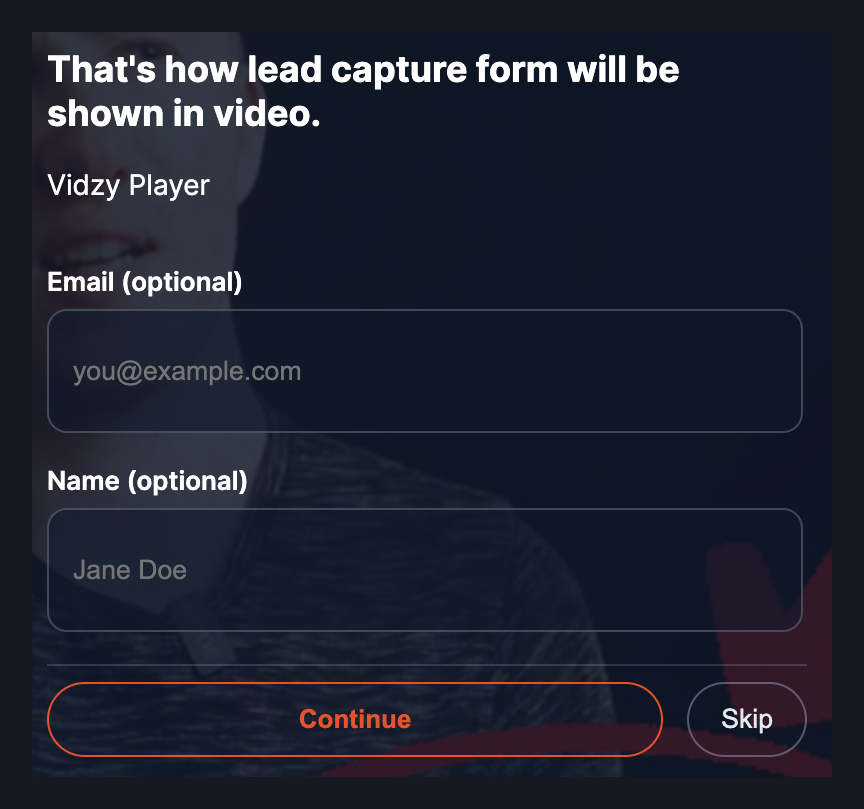
    Optional Vidzy email and name request over a video, with Continue and Skip buttons
    An actual viewer-facing optional form, cropped from the supplied recording screenshot. The underlying video and demo wording are unchanged. This shows one rendered example, not automatic detection of a peak-interest moment.

    Find the relevant leads and choose an export

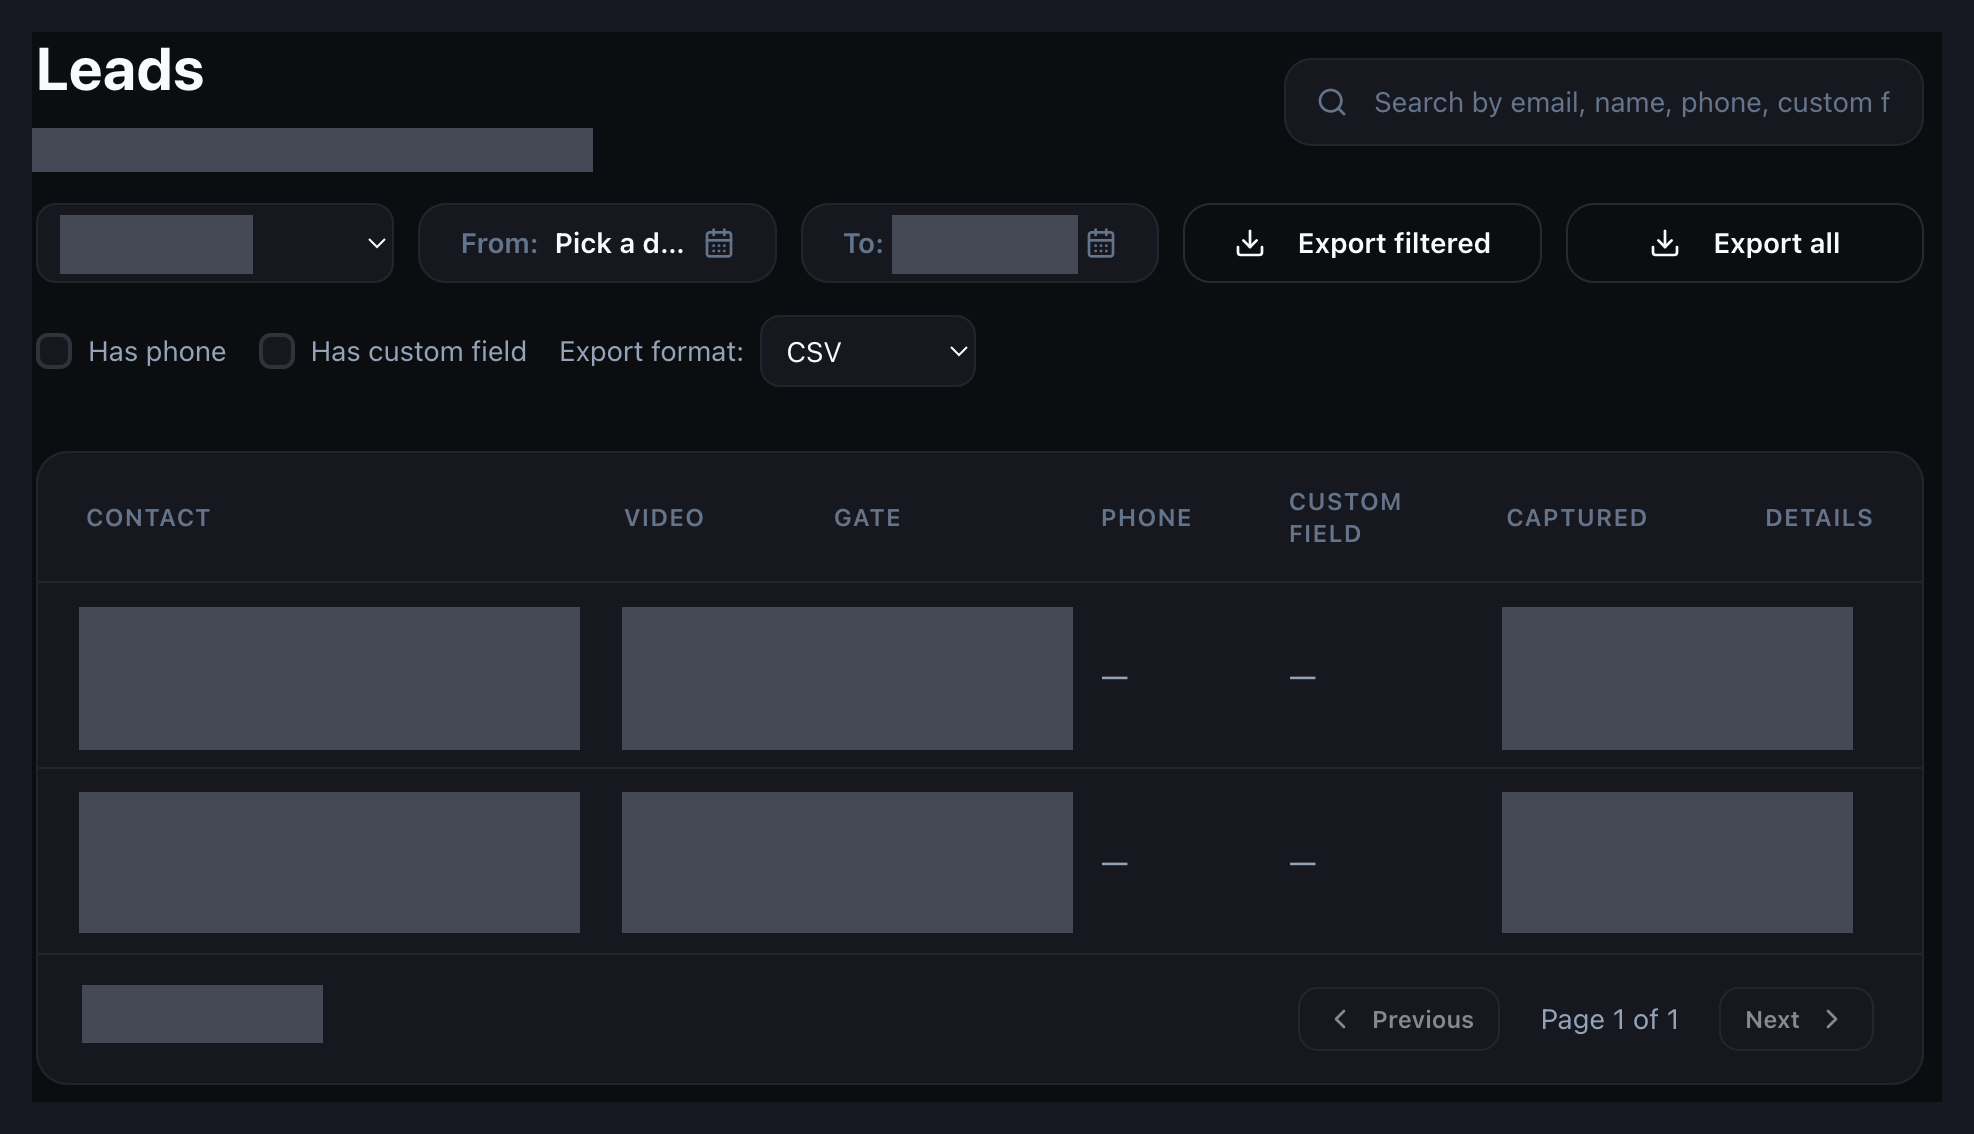
    In the Leads dashboard, search by email, name, phone or custom field. You can also filter by video and date, or by the presence of a phone or custom-field value. Start with the campaign you are reviewing, then narrow the list to the records needed for the handoff.

    Vidzy Leads dashboard with search, filters and CSV export controls; contact data is redacted
    The Leads dashboard, cropped to its working area. Contact details, record values and selected private values are redacted; unrelated controls are omitted. No lead results are claimed from the sample records.

    Use Export filtered when the current selection is the set your team needs. Use Export all when you intend to review the complete set. Check the CSV before handing it over, especially when a teammate will work from the file without seeing the original dashboard filters.

    Review exported emails before handing them over

    Vidzy’s captured-email export is the starting point for this check. The review process below is work for your team; it does not describe built-in cleansing, qualification or lead-management automation.

    Keep the original export intact while reviewing a working copy. Identify your own test submissions, check for repeated addresses and decide how the team will handle them. A repeated address might belong to a person who made more than one request, so do not automatically discard the context of a later request.

    Attach the campaign note to the handoff. Where the source information does not establish which offer a person requested, investigate rather than guessing. Do not manufacture missing video associations, timestamps or contact details.

    Before contacting anyone, have the responsible team review the stated purpose and applicable communication requirements. Keep access to exported files limited to the people who need them, and follow your organization’s data-handling policies.

    Keep capture, fulfillment and qualification separate

    Use different questions for different responsibilities:

    • Capture: Was the submitted email recorded and recoverable?
    • Fulfillment: Did the viewer receive the resource or response they requested?
    • Qualification: Is there additional evidence that this person is a fit for the next business conversation?

    Vidzy provides opt-in tracking, but a recorded opt-in should not be treated as proof of sales readiness. Nor should a tracking count be assumed to represent unique people without checking its definition. Keep the team’s fulfillment and qualification records separate from the capture signal.

    In the workshop example, sending the checklist completes the immediate promise. A later request to discuss a launch project is a different action. Recording those separately makes it easier to see which work has actually happened.

    Use a simple handoff worksheet

    Keep this worksheet in your team’s existing working document. These are suggested process fields, not fields claimed to exist in Vidzy.

    Responsibilities to define for one video lead-capture campaign
    Item What to record
    Campaign context The video, page and offer the team is working with.
    Capture test Who tested the experience, when, and whether the test email was recovered.
    Export review Who reviewed the working copy and how test or repeated submissions were handled.
    Next-step owner The person responsible for fulfilling the viewer’s request.
    Completion evidence What confirms that the promised resource or response was provided.

    Start with one video and one clear offer. Explore Vidzy for timed email opt-ins, lead gates, opt-in tracking and captured-email export, then test the handoff your team will perform after capture. The useful result is a process someone can follow, not simply a growing list of addresses.